

User Provisioning to Google via OKta
Perquisites
To get started, let us first understand what would we need to setup provisioning-:
- Google Workspace or Google Cloud Identity Super Administrator Email and Password.
- Okta Super Administrator User Id and Password
- Atleast one test user account in Okta (either created directly in Okta or brought over by Active Directory)
- You should have already taken care of Google Conflicting Accounts.
I would also recommend to have clarity on which users (and groups) you want to provision from Okta to Google before you start.
Though it really depends on your use case, but I have seen some use cases while doing Okta and Google Workspace implementations where enterprises provision based on following-:
- AD Group based provisioning -: Some organizations create a group in their Active Directory called google_users and then use this as provisioning basis (e.g whoever is member of this group, provision them to Google).
- AD OrgUnit based provisioning -: Though not usual but some organizations go with OrgUnit based approach where any user of a given AD orgUnit gets provisioned to Google (via Okta).
- Attribute based approach -: Some organization in some complex or custom use cases also go with user attribute based provisioning (e.g if the user.department = “IT”, then provision them to Google.
Ideally unless you are very clear on your use case and provisioning approach, you should go with Group based provisioning as it provides more flexibility and do less strain on your AD.
I will show you group based provisioning as it is very commonly leveraged, however i’ll put details below on how to do orgUnit and user attribute based provisioning just in case if you need that.
Also, provisioning process is same regardless of whether you are using Google Workspace or Google Cloud Platform or Google Drive Enterprise.
Provisioning Steps
Login to your Okta tenant
- Go to your Okta tenant (e.g yourcompany.okta.com)
- Enter your User Id and Password (and second factor if it is setup)
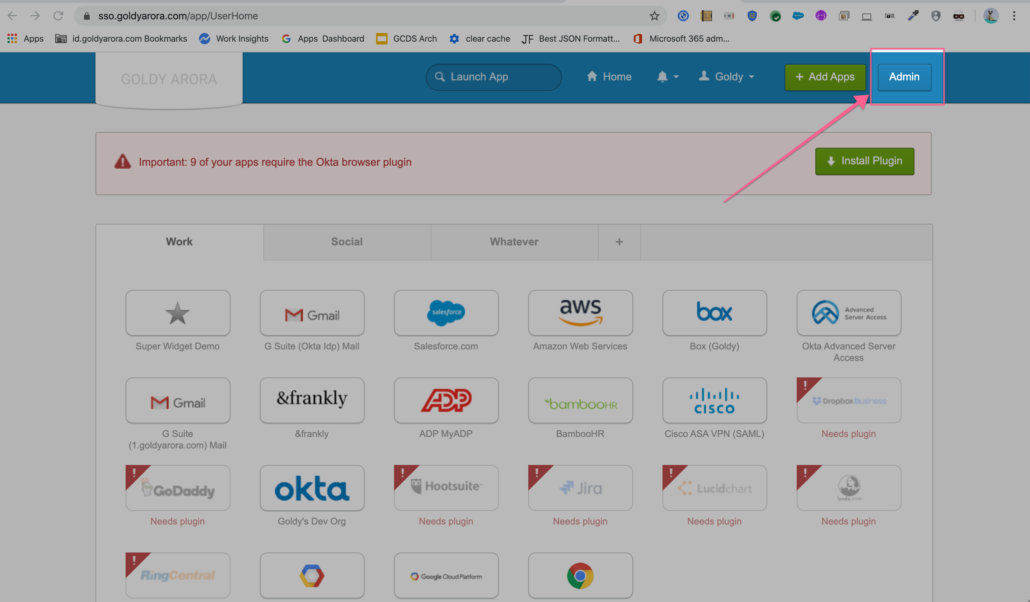
Click on the Admin button on the to right to go to Okta Admin console (as shown in the screenshot below).
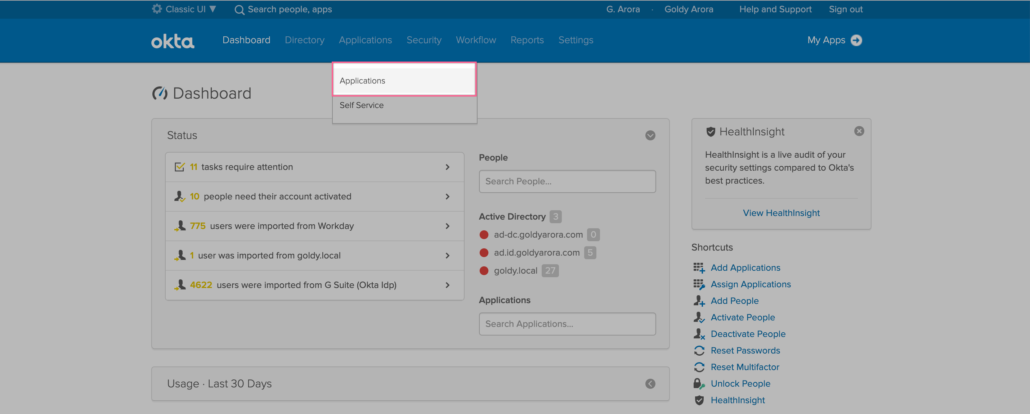
- Go to Applications (as we will be adding Google Workspace application).
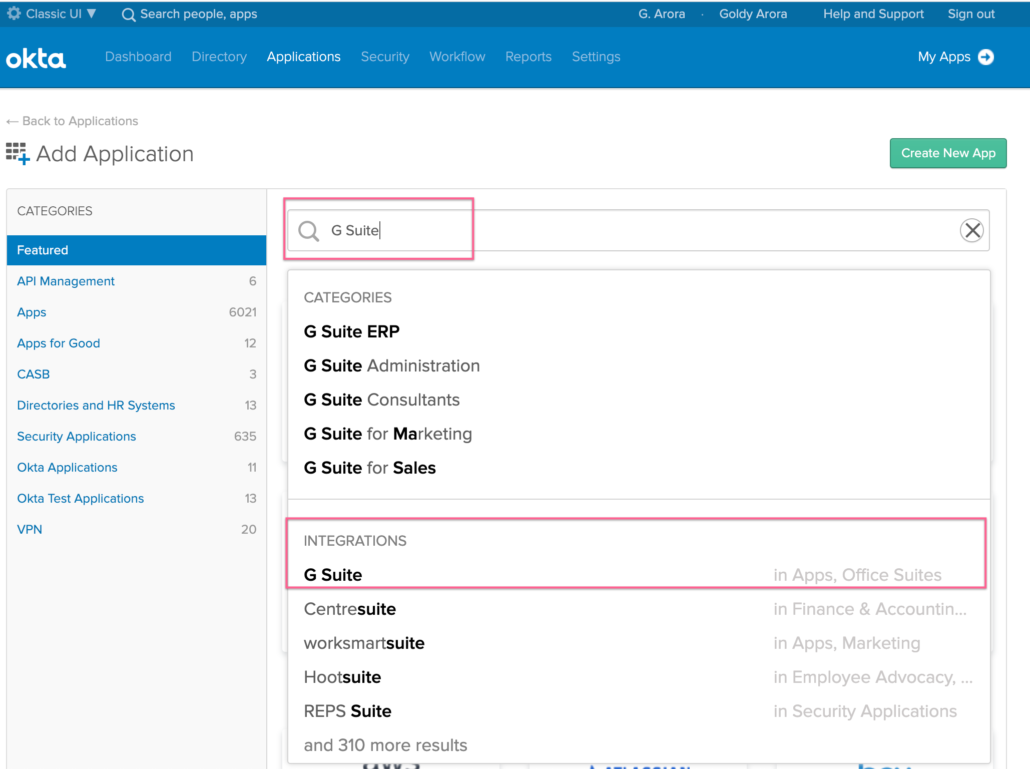
- Click on Add Application

- Search for “Google Workspace” and click on it from the integrations as shown in the screenshot below.
Add Google Workspace Application for provisioning
- Along with Google Workspace, products like Google Cloud Platform and Google Drive Enterprise also leverages Google Directory.
- So even if you use Google Cloud Platform (without Google Workspace), you would still need to add Google Workspace app in Okta for provisioning to Google Directory.
- Think of it like this, though the app here says Google Workspace, but you would be provisioning to Google Directory via it, which can then be used by products like Google Workspace, Google Cloud Platform or Google Drive for Enterprise.
- As you see in the screenshot below, this application supports user lifecycle management to Google Directory.
- Click on Add button to add the Google Workspace application.

- Add your Application label (e.g Google Workspace), this can be changed later.
- Add your Google Workspace (or Google Cloud Identity) domain, this can NOT be changed later, please make sure to put it right.
- Okta provides users a single dashboard where users see the icons of the applications which are assigned to us, if you would provide Okta SSO access to access to Google Workspace, then check the apps you want to show on users dashboard.
If you would only be using Google Cloud Platform (and not Google Workspace), then you would not want to show these icons (e.g Gmail, Drive etc) on your users Okta dashboard, hence these can be unchecked here.
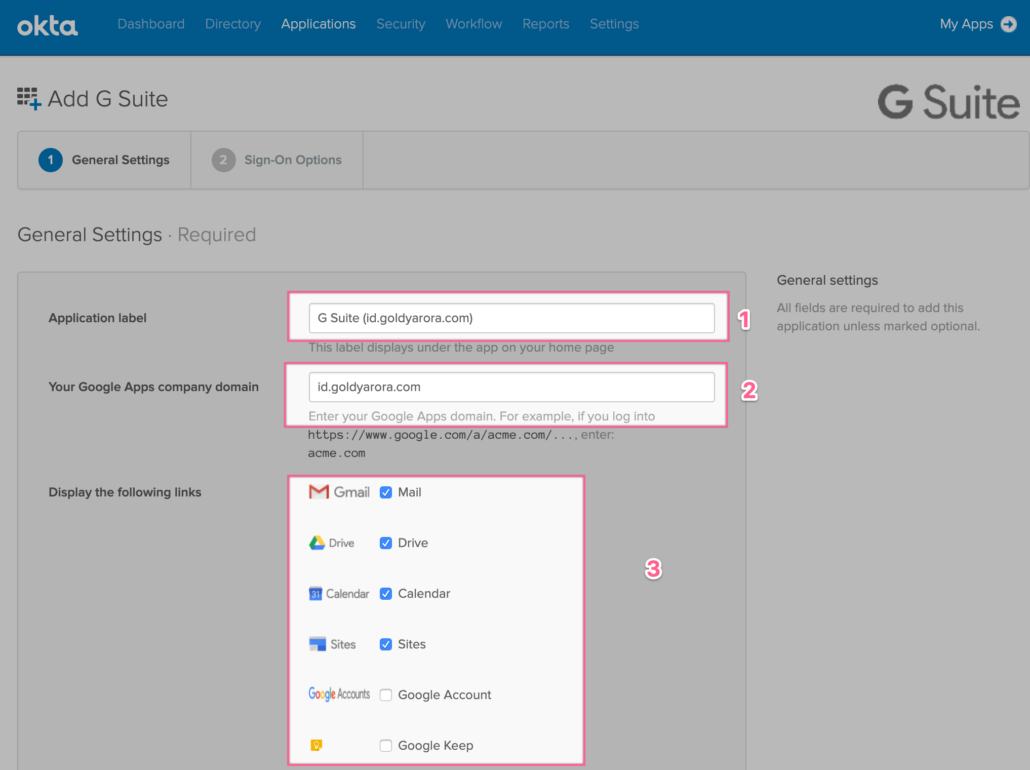
- If you use Google Workspace, Okta provides you functionality to add licenses to your Google Workspace users. You may enter your Google Workspace license count here to leverage Okta seats related reporting.
- You can decide whether to show Google Workspace application icons to users on their Okta dashbaord and in Okta’s mobile app.
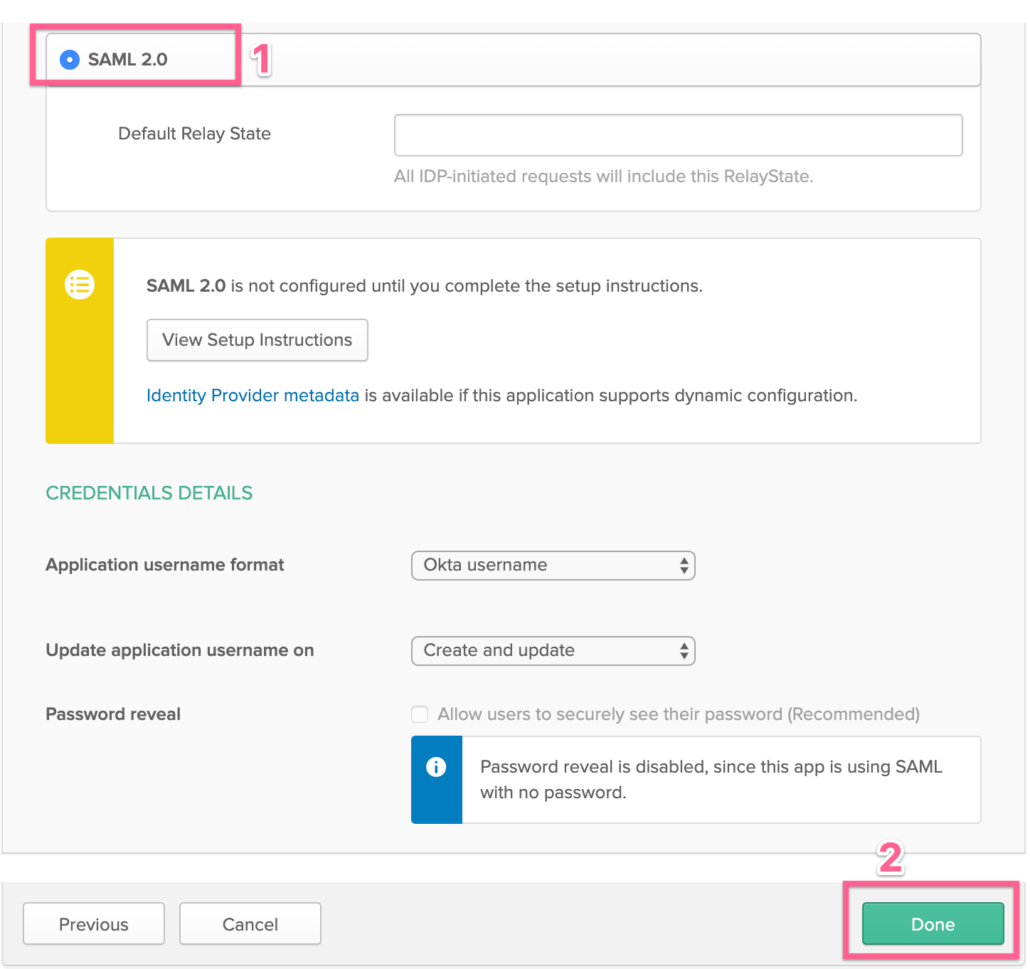
- You would rather be using SAML, do not worry about “Browser plugin auto-submit” and leave it unchecked.

- Click on SAML
- Click on Save
Note -: We are not turning on SAML or SSO yet, Okta only shows the user provisioning features once you enable SAML, hence we will just click on SAML and Save to move forward.
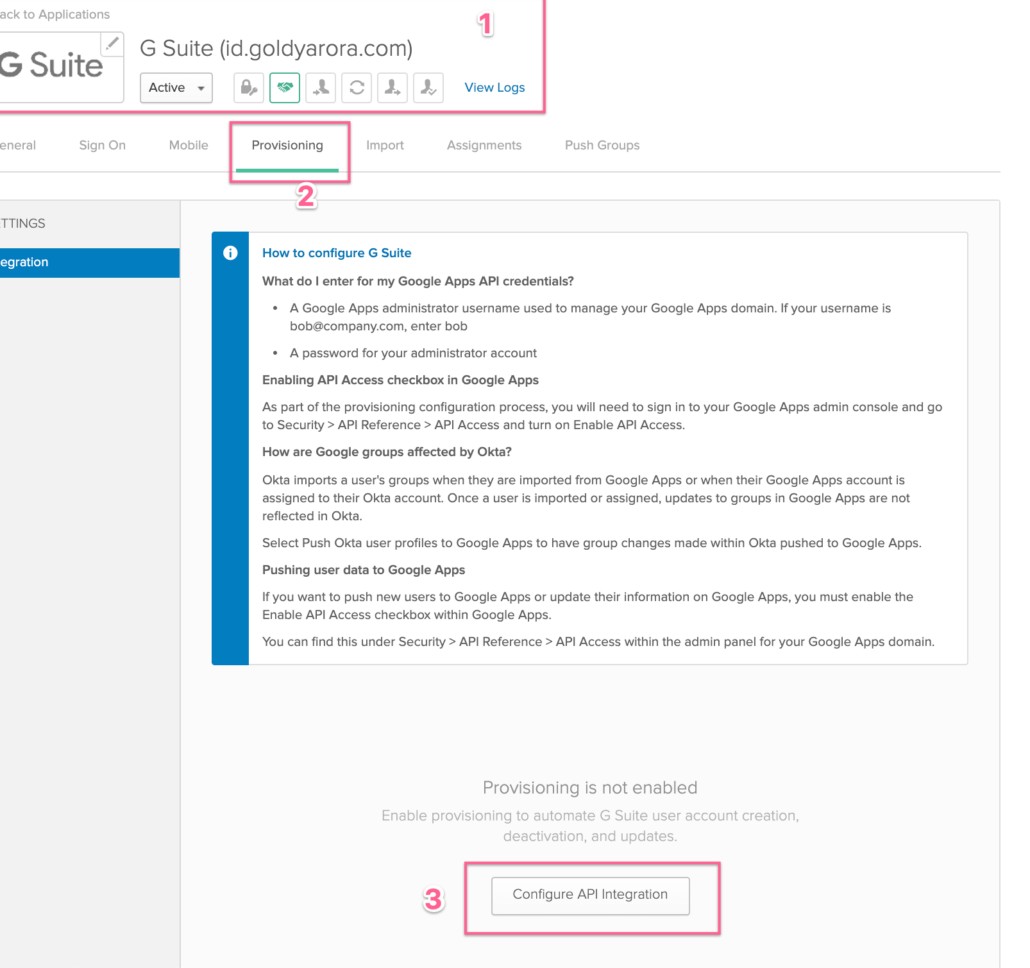
- Now you would see additional options in your Google Workspace app (make sure you are in the Google Workspace app that you started configuring)
- Click on “Provisioning” tab
- Click on “Configure API Integration”
FYI –: As Okta leverages Google’s Directory API to manage Google user lifecycle (e.g creating, deleting, updating Google users).
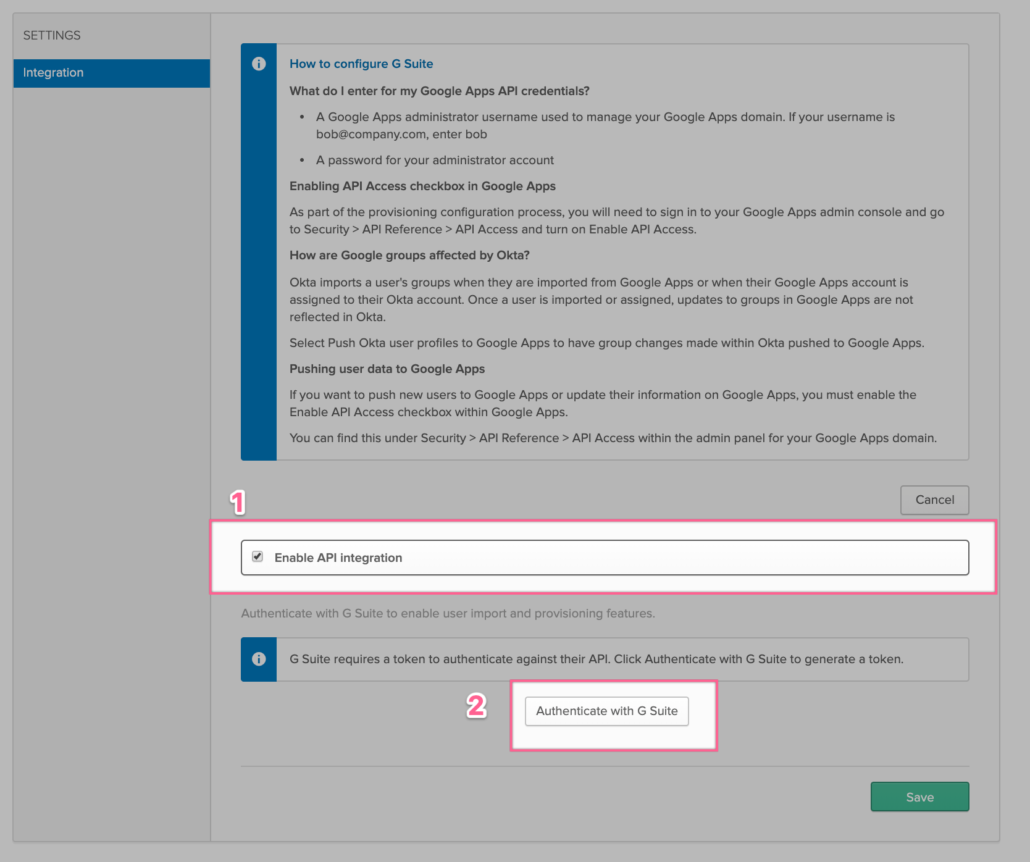
- Click on Enable API Integration
- Then click on “Authentication with Google Workspace”
FYI –: We are now starting the process to authorize Okta (via OAuth) to programmatically (via Google’s Directory API) interact with our Google tenant for users, groups and members management.
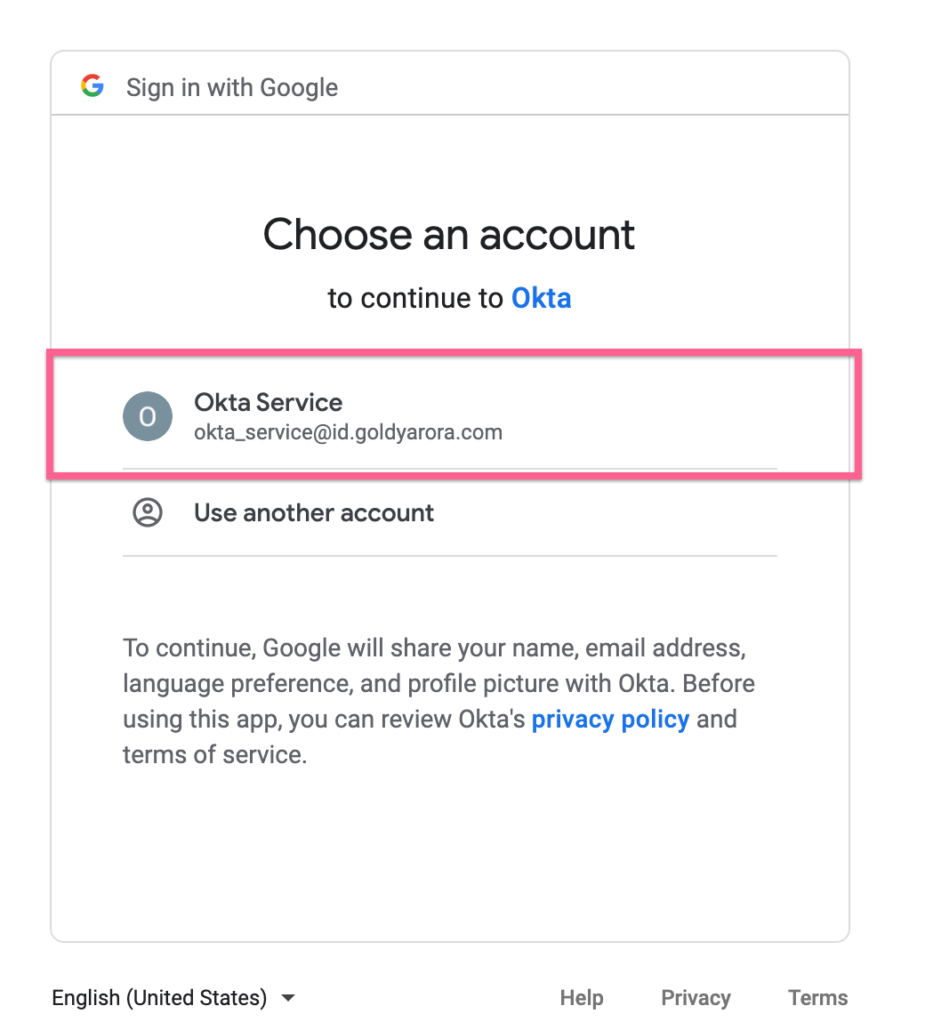
- Login to your Google Workspace Admin account (which should have either Super Admin OR delegated administration based on your requirements (e.g if you need Okta to manage only users, then delegated admin account here should have user management permissions)
- If you are already logged in, please click on the account that you want to use to authorize Okta.
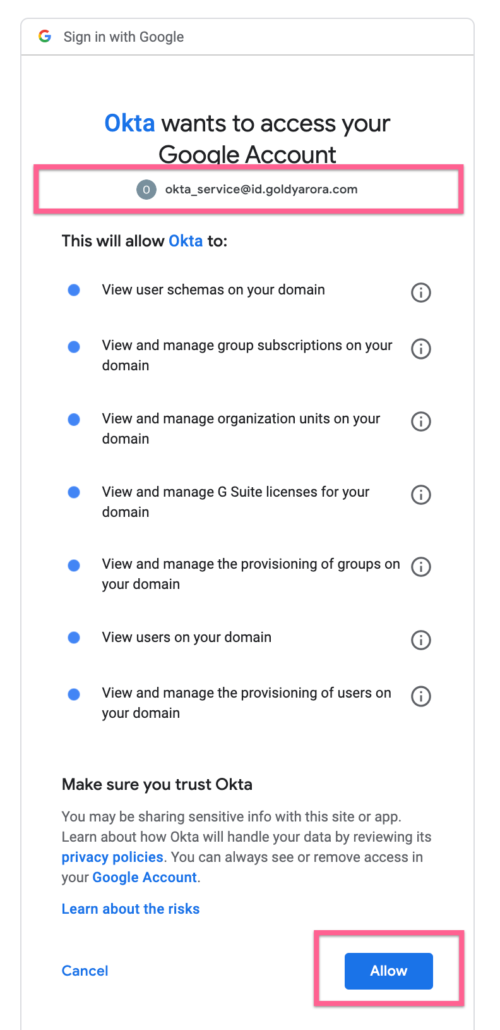
- Google is now providing you information about what Okta would be authorize to manage once you click allow.
- You can also click on exclamation icons to learn more about each OAuth scope here.
- Once/if satisfy, click Allow as shown in the screenshot below.
- You should now see the successful message that your API integration has been enabled successfully.
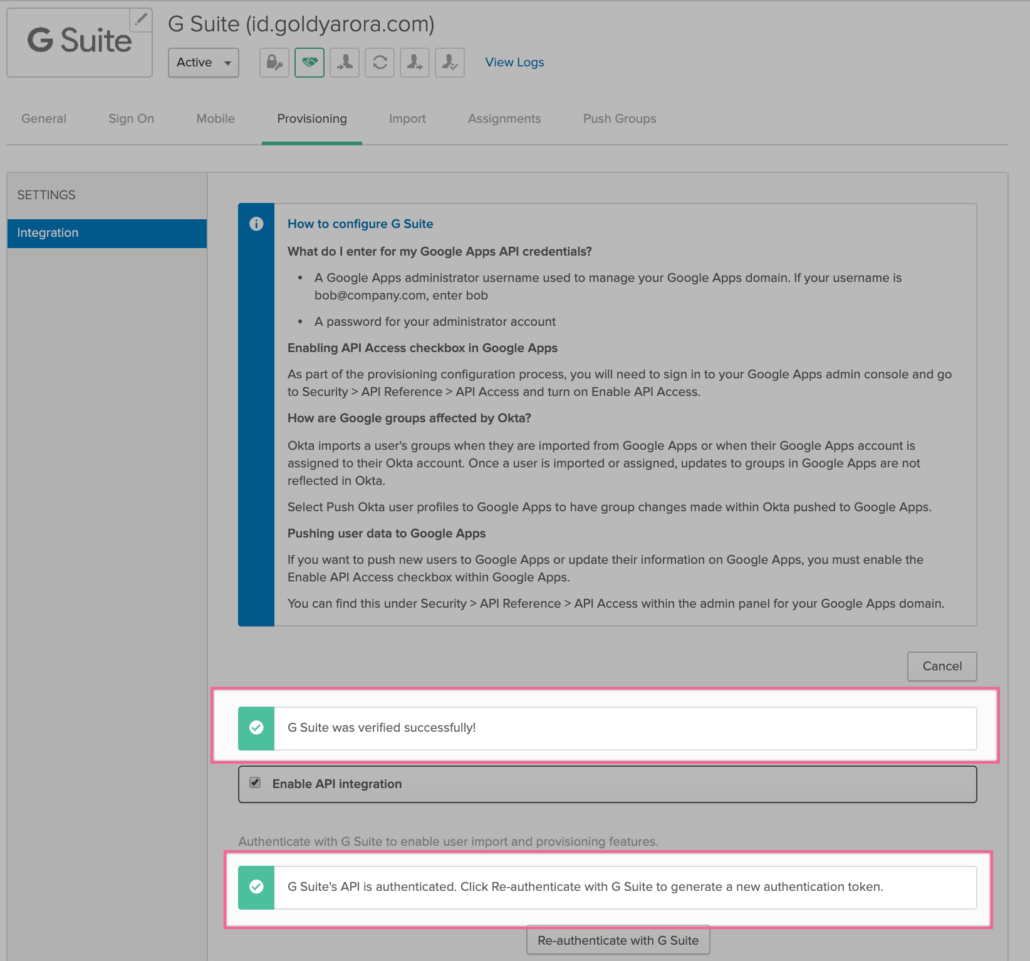
- Click on Save.

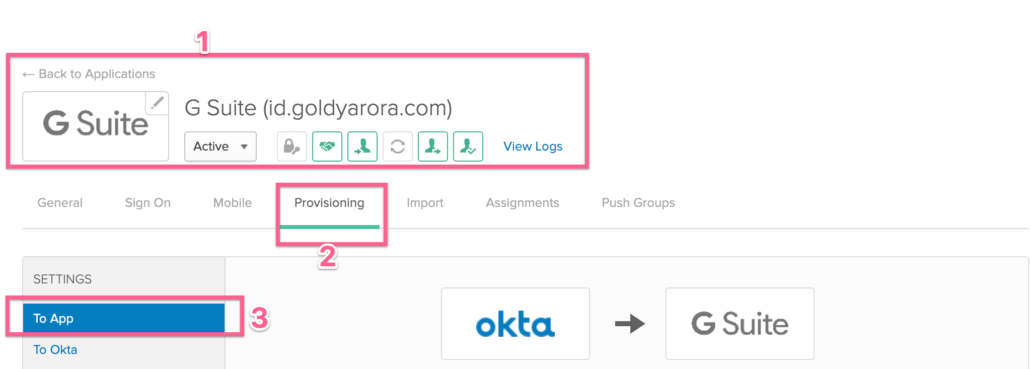
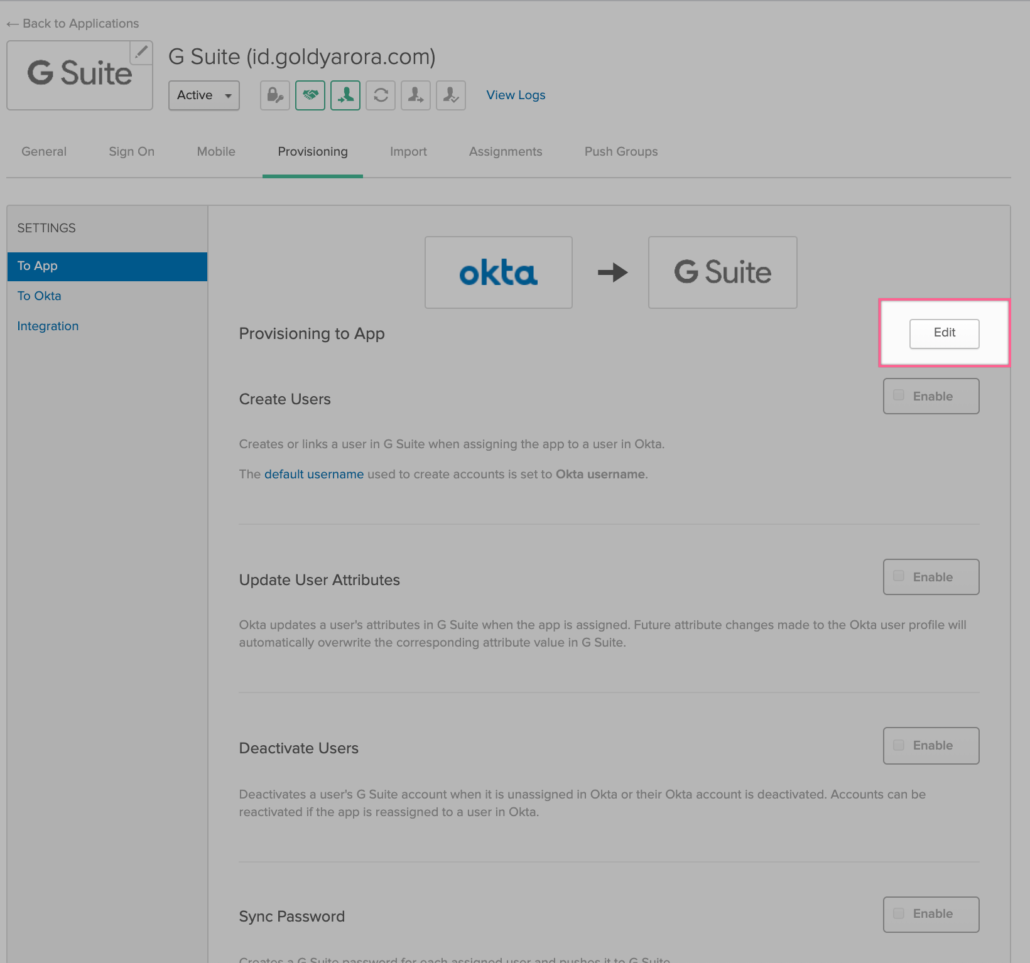
- Please make sure that you are in the same Google Workspace application that you are configuring
- Click on Provisioning
- Important –: Please make sure the flow of provisioning is from Okta to Google Workspace, and then click on “Edit” as shown in the screenshot below.
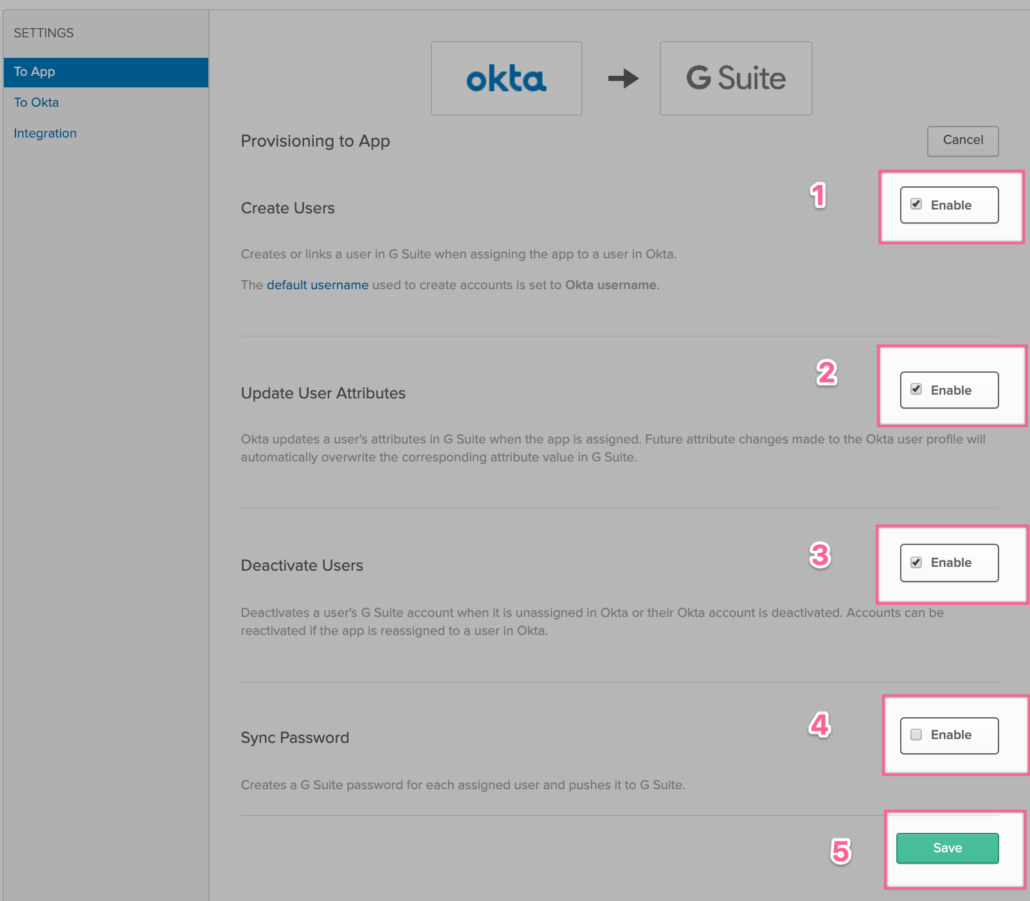
- Enable “Create Users” if you want Okta to create users in Google Directory.
- Enable “Update User Attributes” if you want your users attributes to be synchronized from Okta to Google.
- Enable “Deactivate Users” if you want your suspended or deleted Okta users can be suspended or deleted in Google.
- Enable “Sync Password” if you want Okta to push your Okta user password (or AD password if you have AD delegated authentication setup).
- Once done, click on Save to save your changes.
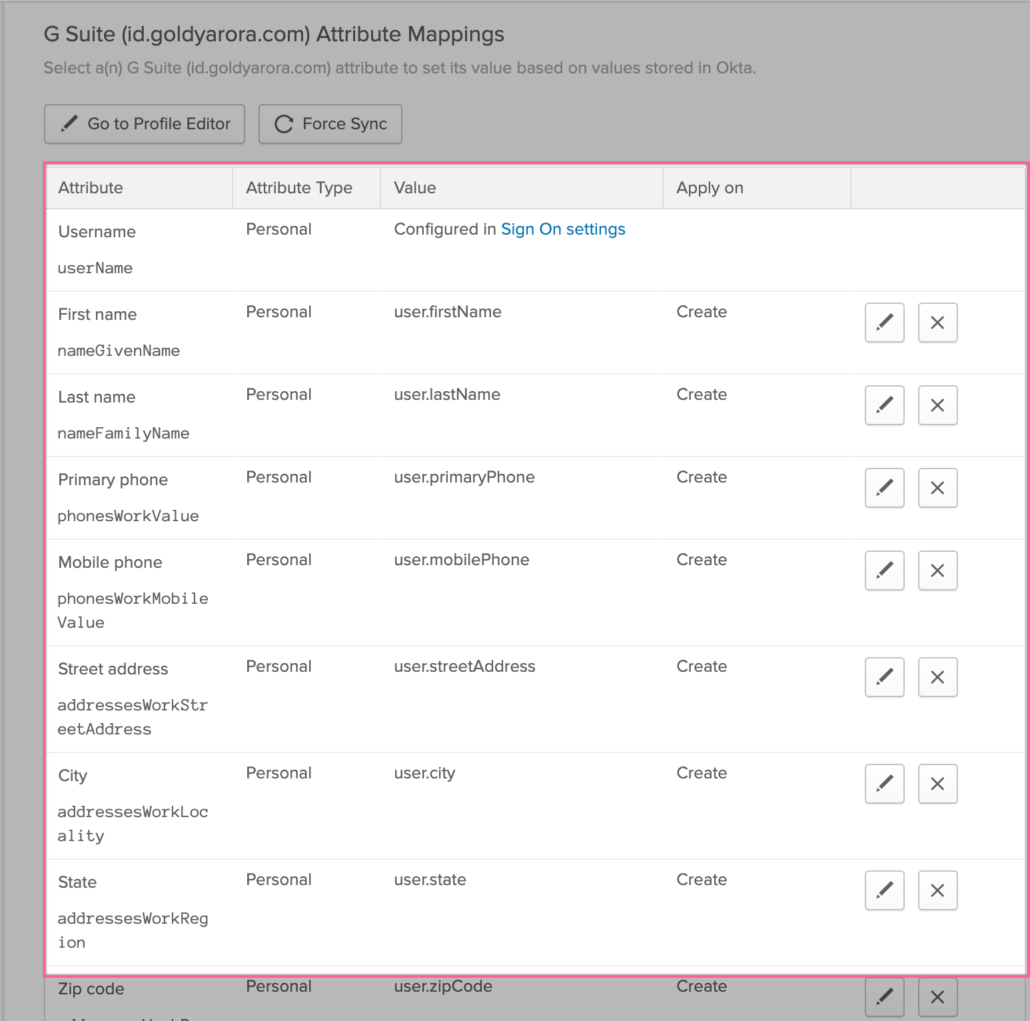
- If you scroll below, you would see user attribute mapping, where Okta should have already mapped primary attributes (e.g Name, email etc).
- However, Okta provides you flexibility to map any attributes as per your requirement including the custom attributes that you have created in your Okta (e.g a custom attribute called “T-Shirt Size” to sync with Google Directory.
Testing our configuration
- We are now done with setting up user provisioning from Okta to Google Directory, its time to test our configuration.
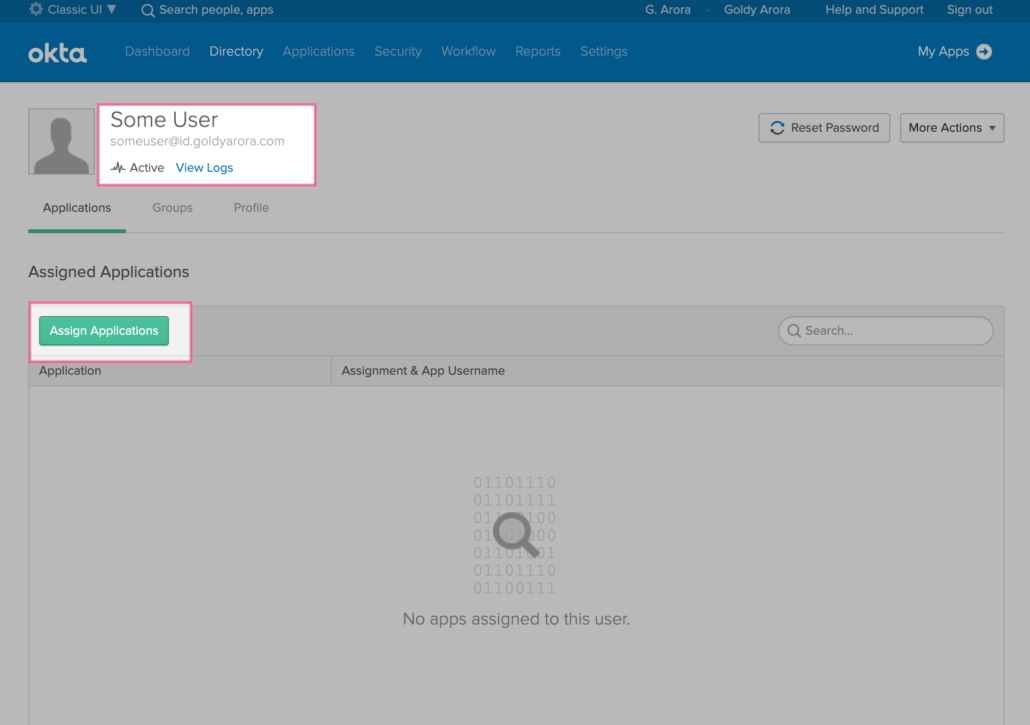
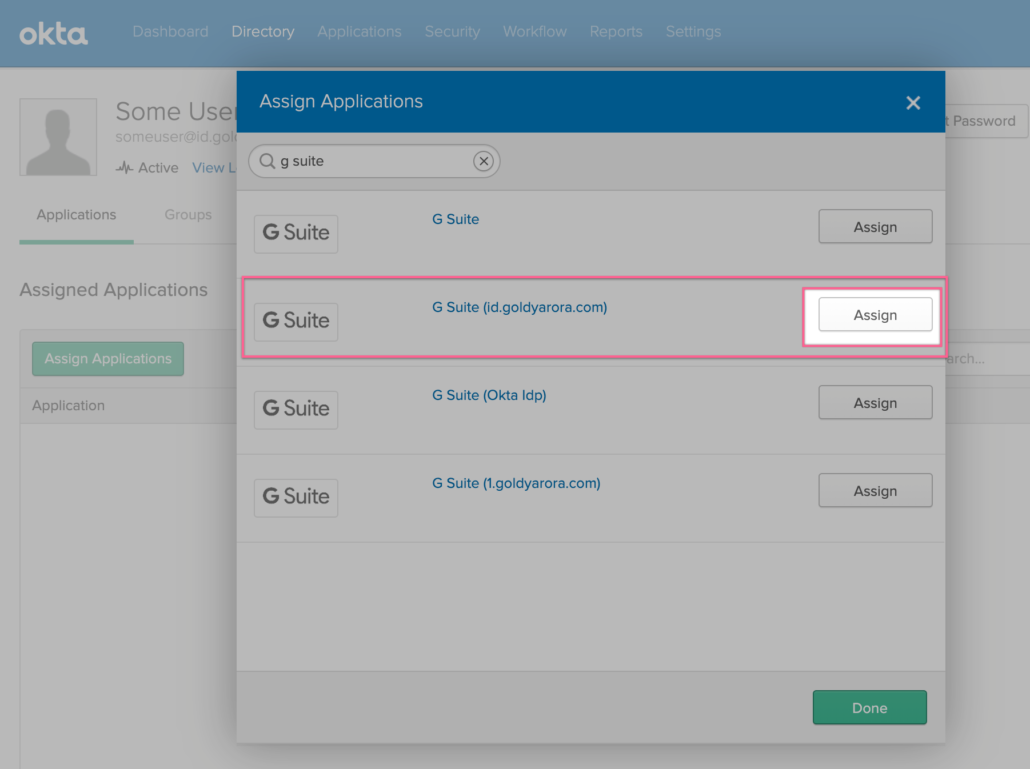
- You would create a test user in your Okta tenant (or use existing if you already have one) and assign him/her Google Workspace application.
Note -: For now we first need to test our configuration with a test user, however later in this post we will set up group based provisioning for dynamic and scalable provisioning.
- If you have configured integration with multiple Google Workspace tenants, please make sure to assign our test user the correct Google Workspace tenant.
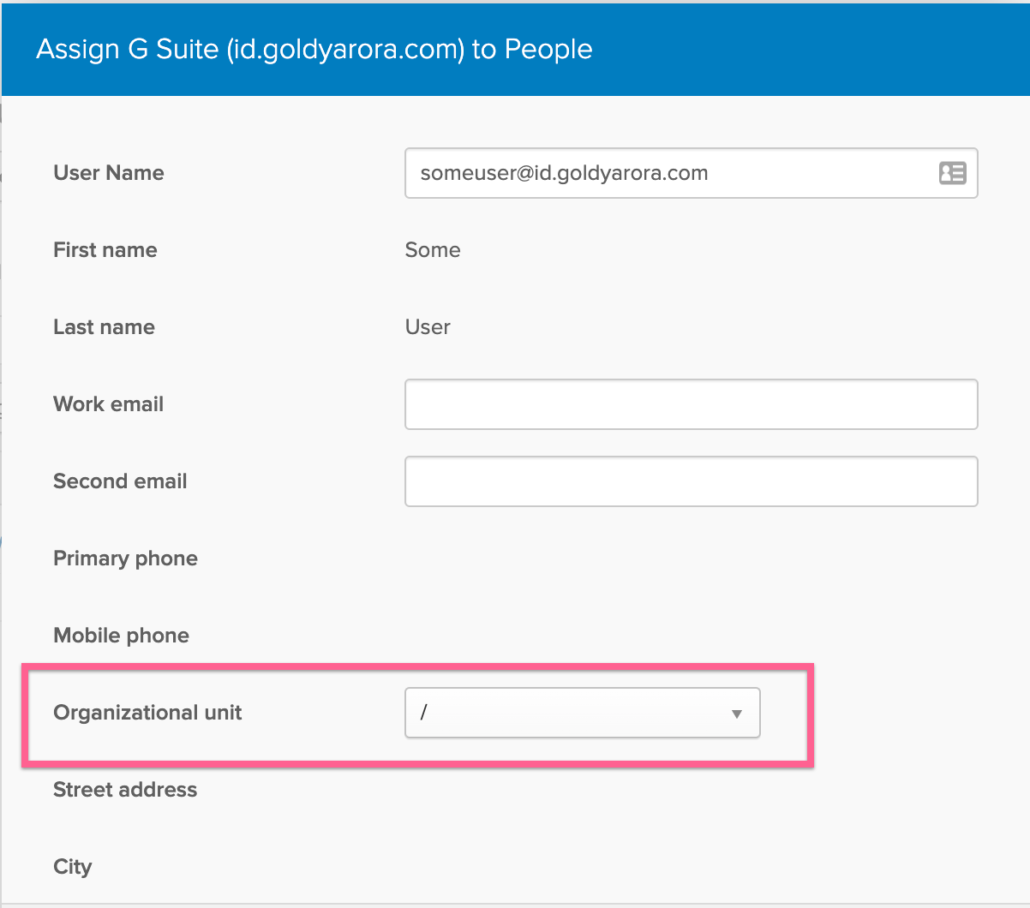
- Choose the Google Organization Unit where you want to create this test user.
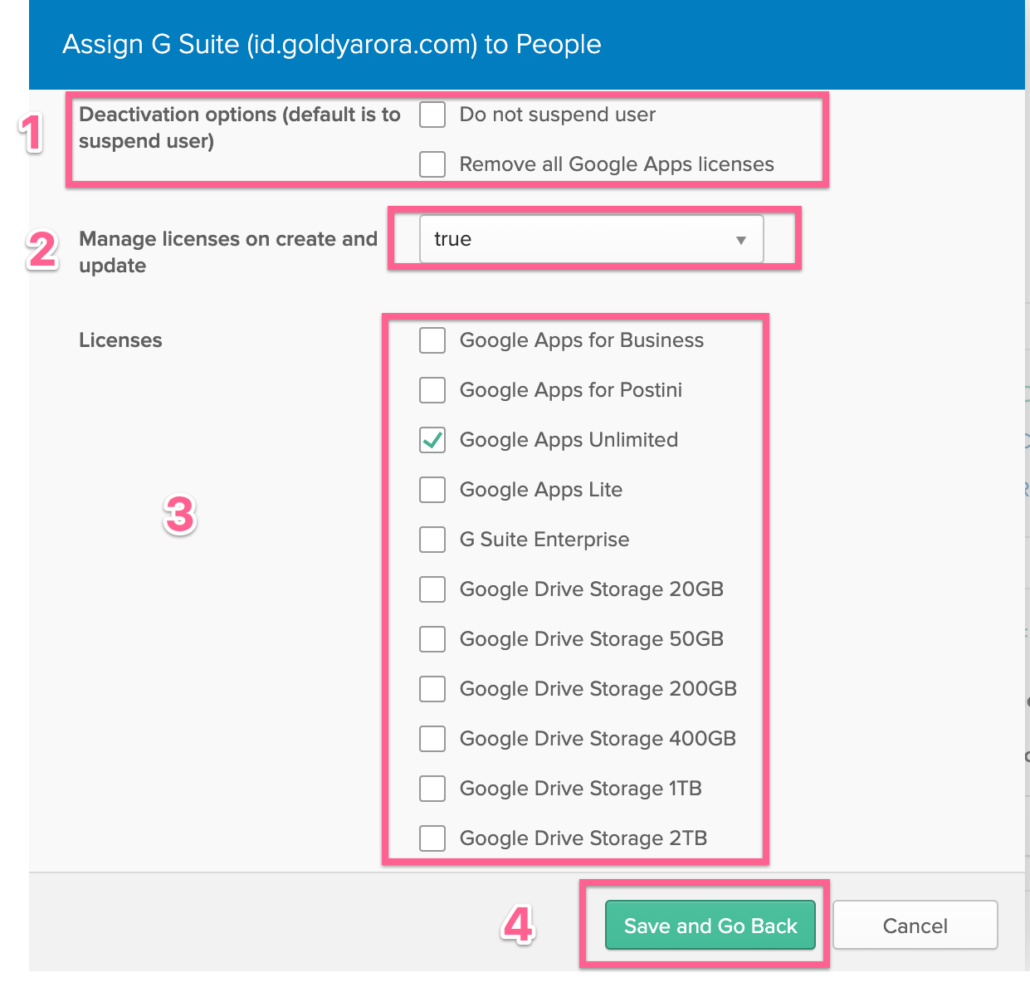
- By default Okta suspends the users who is deactivated in Okta, you can check the box “do not suspend user”, ideally leave it unchecked.
- Okta can provide your Google Workspace license reporting, you may consider putting “true” to manage licenses on create and update.
- Select the license you want Okta to apply to this user (Note – If you do not use Google Workspace, and configuring provisioning for GCP, you can select “Cloud Identity” license at the bottom from this list.
- Click on Save and go back.
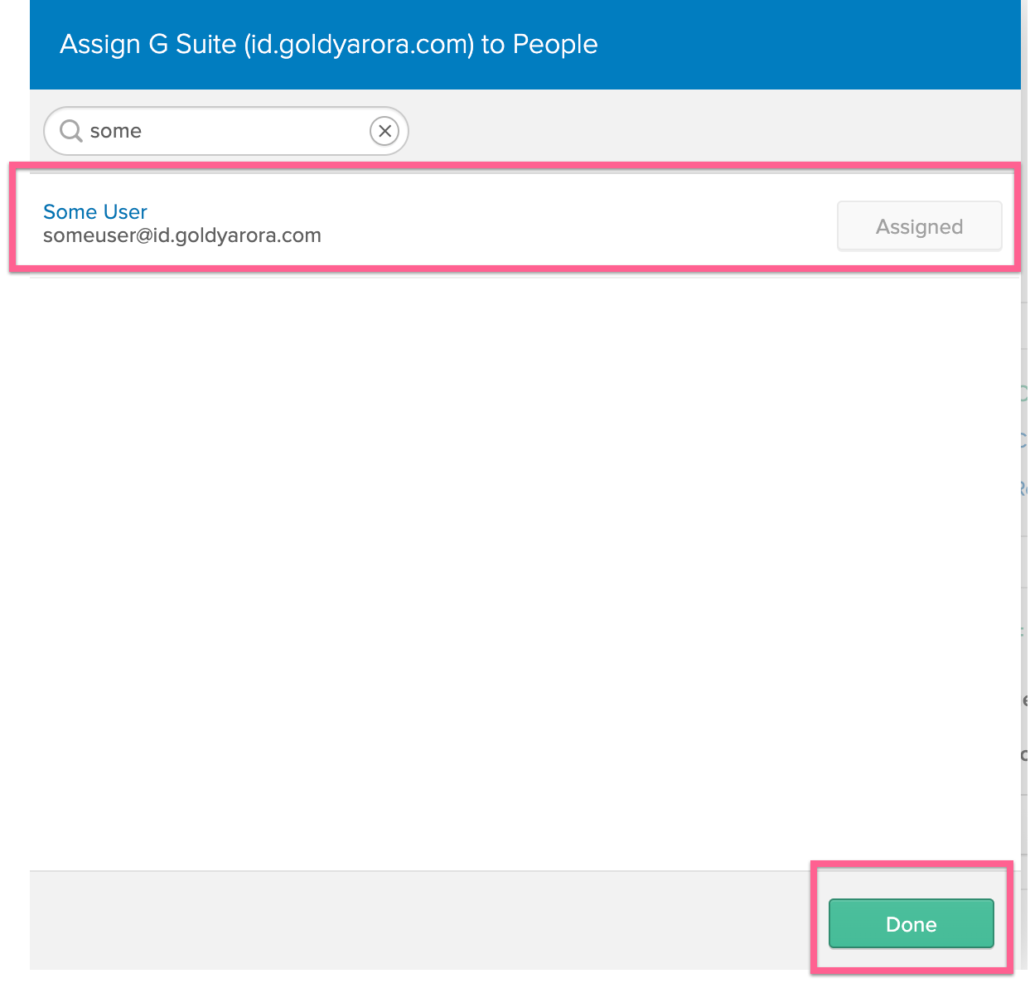
- You should see the application as “Assigned” now, click on Done.
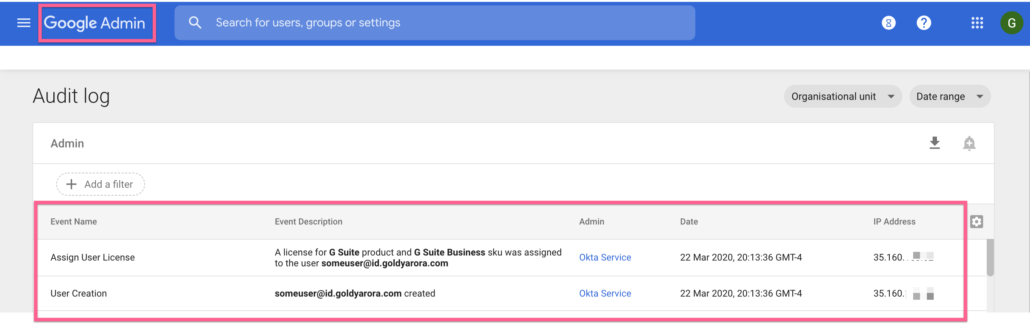
- You should give it a few minutes and then go to your Google Admin Console –> Reports –> Admin.
- You should see that Okta created our test user account in Google and also assigned the license we requested for this user.
If it has been a few minutes and you still do not your test user created, please look at the logs in Okta and in Google. Also, please make sure your Google service account has required permissions.
Scaling our user provisioning
- After testing our provisioning setup successfully, I will now leverage Okta’s “Group based provisioning” to add all required users to Google directory.
- Okta supports (i) AD Mastered Groups (ii) Application Mastered Groups and (iii) Okta Mastered Groups for provisioning.
- Though I personally prefer to go with Okta mastered groups because it allows to define dynamics membership rules (even if/else conditional rules), but let me show you both AD mastered and Okta mastered group assignment below.
- Click on the toggle below to see configuration for AD mastered group and Okta mastered group.
Option 1 - Use Active Directory Mastered Group
If you already have a group in your Active Directory that includes the users you want to provision to Google (via Okta), then you can simply choose this group.
However, you would need to keep managing this group in Active Directory as Okta would be making changes to Google directory based on this group membership (e.g if someone is removed from this group, Okta would suspend that user from Google)
I personally prefer “Okta Managed” groups which allows more granularity as you see in the toggled section (Option 2) below.
Option 2 - Use Okta Mastered Group (Recommended)
Leveraging Okta mastered groups for provisioning in target app
I personally prefer to go with Okta groups because it allows to define dynamics memberships based rules (even conditional rules).
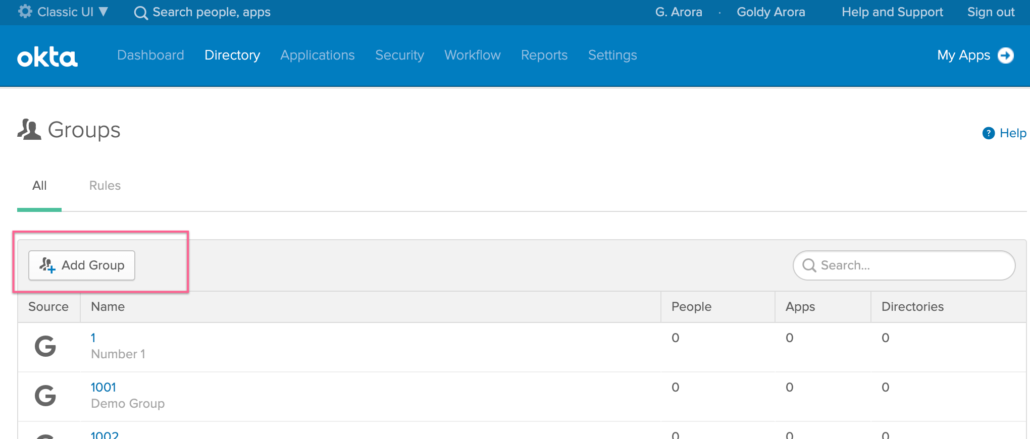
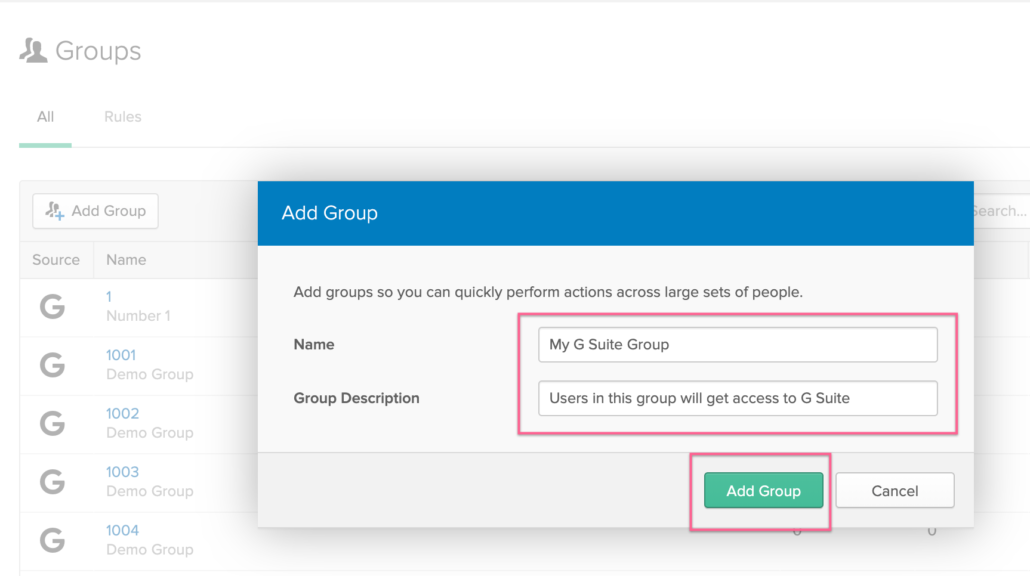
Let me show you how to create an Okta group, populate it with members based on our condition, and finally use it as a basis for provisioning.
Step 1-: Login to Okta Admin Console and go to Groups as shown below

Step 2 – Click on “Add Group” to create a new Okta mastered group
Step 3 – Name your Group and give it a description to it becomes easy to find later
Step 4 – Create a new Rule
Let us now create a new rule in our Okta group to
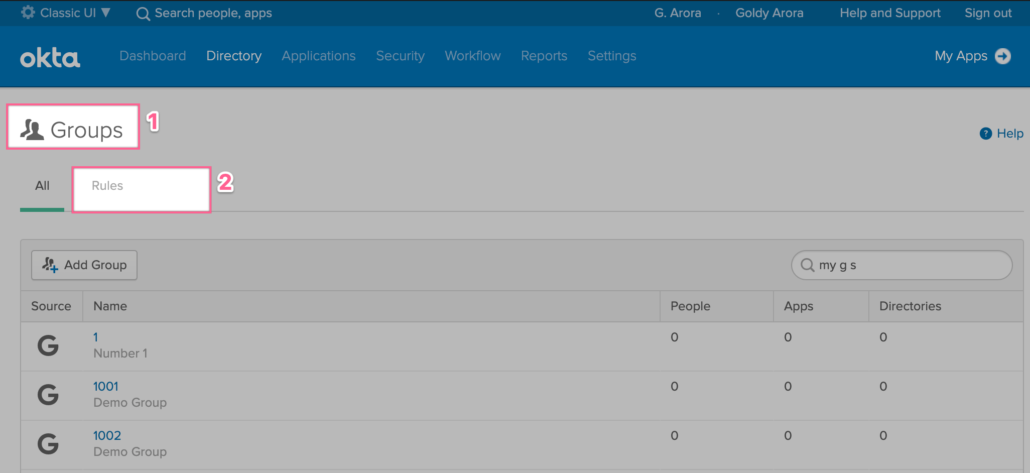
Step 4 – Create a new Rule
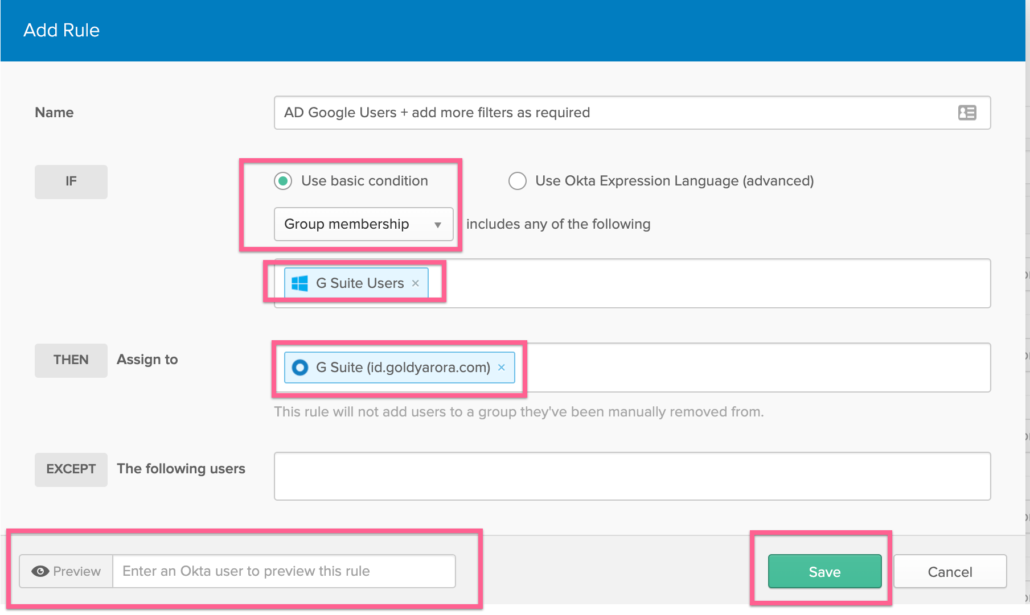
- You can add users to your Okta group either by selecting “Groups Memberships” as we are doing in the screenshot below.
- You can also use user attributes like user.department = “IT”
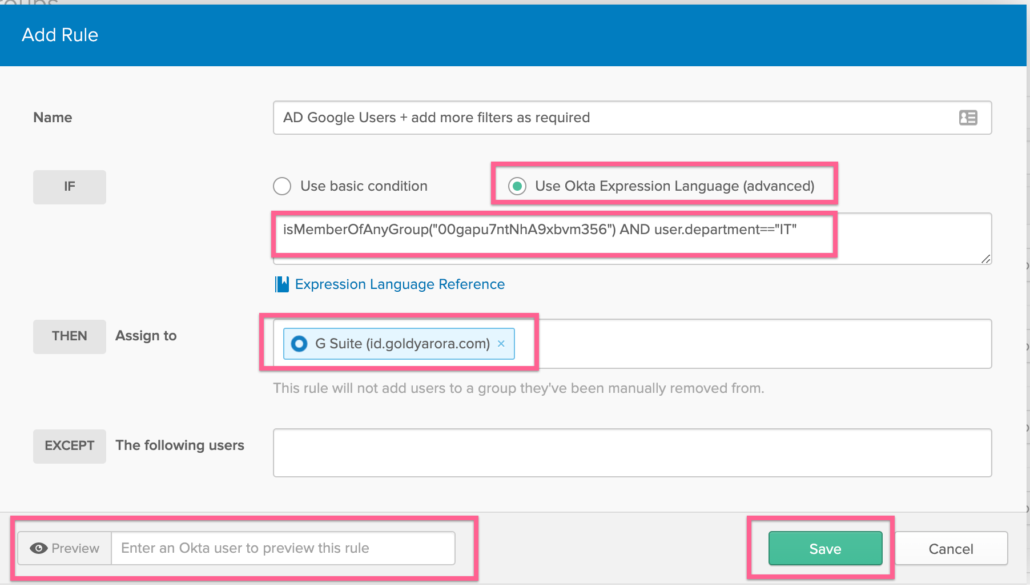
- If you need more flexibility to go granular, you can leverage Okta expressions where you can really combine attributes and groups memberships, and can also use conditionals.
In this example, I am simply asking Okta to add members of my Active Directory Google Workspace users to my Google Workspace Okta group (this will be dynamic so if i change the group membership in AD, it’ll be in sync at next Okta directory sync run).
- In this example below, I am using Okta’s expression language to only add members to my Okta Google Workspace group when they are members of Google Workspace group in my Active directory AND if their department is equal to IT.

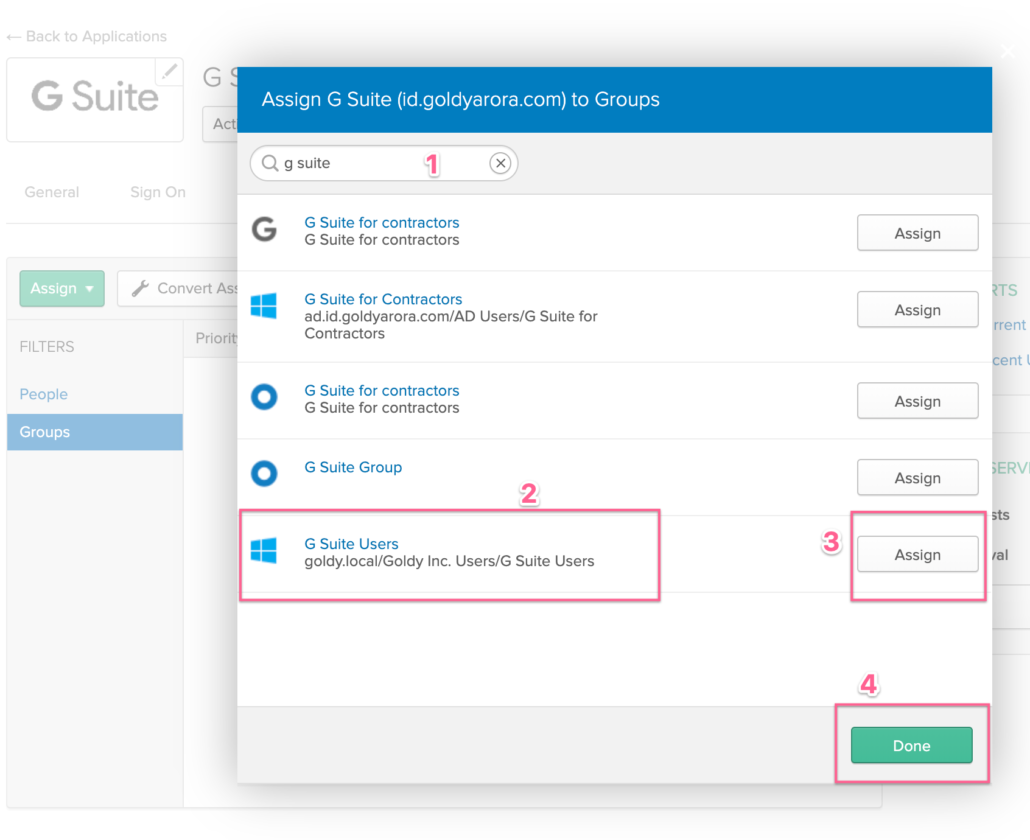
Assign Group for Google Workspace provisioning Scope
- As our group is now available in Okta (either the AD mastered or Okta mastered group).
- Its time to assign it to Google Workspace for our provisioning scope as shown in the screenshot below.
Related Posts
....


