
Google Workspace IP Addresses Tracker to get and track Google IP ranges
How to keep track of Google Workspace mail server IP addresses
In this blog post you will learn how to access and track the IP addresses of the Google Workspace mail servers. You can either do it manually by running DNS lookup commands, or you can use a Google Sheets tool described here.
Overview
In 2019, more than 293 billion emails are being sent worldwide every day, and the figure is projected to grow to 347 billion by the end of 2023 (source). Gmail has over 1.5 billion active users worldwide, according to Statista.
So, you can very well understand the quantity of incoming and outgoing emails the Gmail servers, that are basically the backbone of Google Workspace email servers, must have to handle on a daily basis.
To handle this massive traffic, Google maintains a global infrastructure that scales dynamically as per the demand. These are email servers. Email servers are used to handle incoming and outgoing traffic.
Every email server has a unique IP address. Since these email servers are randomly chosen to handle email traffic, your emails need to interact with multiple IP addresses on different occasions.
The same is the case with Google Workspace. When using Google Workspace, you need to set up an email account (or multiple email accounts according to the needs of your organization or business) for your domain.
When you send emails to your customers, clients and business partners, their email clients, they want to make sure that the email is actually coming from you and not from a spammer. You do this by adding an SPF record to your domain
SPF stands for “Sender Policy Framework”, to summarize, this is the way for you to tell your recipient email servers about the email servers you authorize to send emails on your behalf.
This way your recipient email servers can check if the email came from your authorized email server or not.
You can watch my video guide on Google Workspace SPF record for better understanding.
There is no definitive list of your Google Workspace mail server IP addresses. As mentioned above, these servers are randomly picked according to the demand.
Hence, even if you have a list of the Google Workspace mail server IP addresses, sometimes a list may change. It doesn’t happen often but if and when it does, it may stop certain emails from reaching destination in boxes. For such a case scenario, it is advisable that you have a system of tracking your Google Workspace mail server IP addresses in cases where instead of using SPF, you are relying on the list of Google Workspace block IP addresses.
Why do you need to track Google Workspace IP addresses ?
An example of why you would need to access and track a list of Google Workspace mail server IP addresses
My Use Case -: Email Outbound Gateway
- An example of why you would need to access and track a list of Google Workspace mail server IP addresses
Suppose you’re using an external email outbound gateway.
You may want to set up an outbound gateway server with your Google Workspace account to route all outgoing messages from your domain for the purpose of spam filtering or archiving.
An external email outbound gateway gives you more control over what types of messages are allowed to go to your recipients from your domain so that if a spam or a phishing attack is attempted using your domain, it can be stopped before it passes through the external email outbound gateway. Such an attack, if left unchecked, can cause irreparable damage to your business and brand.
You can set up rules in your email outbound gateway service to process email messages before they are delivered so that messages carrying certain attachments and bits of information are not allowed to pass through.
Most of the outbound mail gateway servers need you to supply a list of approved IP addresses through which email messages can be accepted.
These are white-listed server IP addresses.
You have to manually enter all the Google Workspace mail server IP addresses that should be allowed to relay email messages. This way the spammers won’t be able to use your gateway for open email relay.
If the IP address from where the email is coming does not already exist at the outbound mail gateway server list of approved IP addresses, the email will not be allowed to go further.
The problem is, since the IP addresses under your SPF record may change (because Google Workspace scales the servers up and down according to the demand at a particular point), in case there are a few IP addresses that haven’t yet been entered in your outbound mail gateway server account, the emails originating from these IP addresses will be stopped, even the legitimate ones.
Hence, you need to keep track of the changes and keep updating the list.
To enter all these Google Workspace mail server IP addresses so they are white-listed and approved, two things are needed
- The current list of Google Workspace mail server IP addresses.
- A way of finding out if the list has changed so that it can be updated on your outbound mail gateway server side.
Google Workspace IP Tracker
In this section, I will talk about how this utility can help you get and track IP ranges behind Google Workspace.
So What is Google Workspace IP Tracker?
Google Workspace IP Tracker is a free utility built with Google Apps Script which helps you easily get list of all Google Workspace IP addresses, automatically track changes in them, and notify Google Workspace Administrators in case of any changes found.
Getting Google Workspace SMTP Server IP addresses manually (painful)
Although you can manually get the Google Workspace IP addresses that your Google Workspace account currently uses, accessing this list manually, regularly, might be cumbersome and prone to mistakes.
This manual method is as per Google support documentation page here https://support.google.com/a/answer/60764?hl=en
You can obtain a list of the current Google Workspace IP addresses by using the DNS lookup command like nslookup, dig, host and retrieve SPF records for your domain. For example, to retrieve the SPF records for the domain _spf.google.com you would use the following command:
nslookup -q=TXT _spf.google.com 8.8.8.8
This gives you a list of all the domains included in Google’s SPF records such as _netblocks.google.com, _netblocks2.google.com, _netblocks3.google.com.
After this, you can, turn by turn, look for the DNS records associated with these domains, one at a time:
nslookup -q=TXT _netblocks.google.com 8.8.8.8
nslookup -q=TXT _netblocks2.google.com 8.8.8.8
nslookup -q=TXT _netblocks3.google.com 8.8.8.8
You can replace “google.com” with your own domain.
As you can see, if done manually, you will need to run these commands every day, or at least, whenever you want to seek out an updated list of your Google Workspace IP addresses.
To help you refresh your list everyday or to make sure that there are no changes that need to be done in your outbound mail gateway server list of white-listed IP addresses, you can use my Google Workspace IP tracker script that I have built using App Script.
Once you have installed it in your own Google Workspace account using Google Sheets, it will automatically run at a set interval to fetch the list of your Google Workspace mail server IP addresses, compare it with the last updated list, and in case there is a change, notify you by mail in case a change is detected.
How does Google Workspace IP Tracker work?
- Let’s suppose I want to track the progress of my weight loss effort.
- I take my weight for the first day and note it somewhere.
- Then the next day I again take my weight and compare it with my weight from the previous day.
- For comparison, I need yesterday’s weight and today’s weight.
- We follow the similar logic while tracking the Google Workspace mail server IP addresses to make sure that we have an updated list.
- Fetch the list of Google Workspace mail server IP addresses for the first time in one column.
- You copy this list to the adjacent columns so that the next day this column can be compared when the list of Google Workspace email IP addresses is fetched again or refreshed.
- The second day, the script again extracts the list of Google Workspace mail server IP addresses and compares it with the list in the adjacent column (mentioned in point 7 above).
- If there is no change, nothing happens.
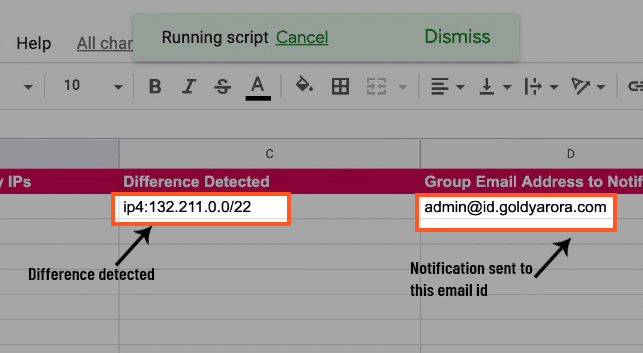
- If a change is detected, the new IP address is mentioned in a third, dedicated column.
- An email is sent to you (or to a designated group) notifying you of the changes detected.
Google Workspace IP Tracker - Installation
In this section, I will tell you how to install this utility in your domain, so you can get a list of Google IP addresses, and can also easily track changes in them.
Step 1 -: Login to Google Account
Log into your Google Workspace (or Gmail) account and go to your Google Sheets section. This is the account you will be using to track your Google Workspace mail server IP addresses. This is also needed for authentication.
Step 2 -: Go to iptracker.goldyarora.com
The web page will prompt you to copy the IP tracker script onto your own Google Workspace account.
Step 3 -: Copy Scripts Sheet
Click the “Make a copy” button and it creates a Google Sheets copy under your account.
Don’t worry about a blank worksheet. You will need to execute some menu commands to fetch the Google Workspace mail server IP addresses.
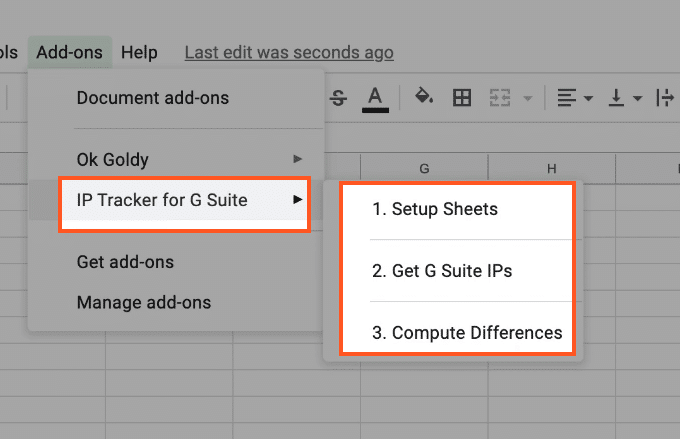
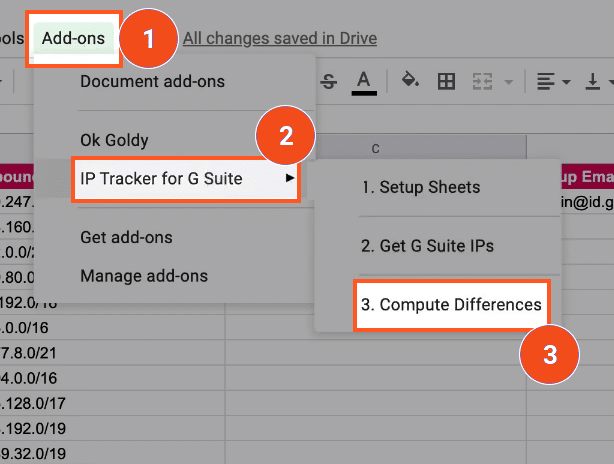
The new commands must appear under the “Add-ons” menu. It may take a few seconds for the new commands to appear. Once they do, you will have the following addition to the “Add-ons” menu:
Step 4 -: Setup Sheet
Go to the IP Tracke for Google Workspace from the add-on menu and click on "1. Setup Shets".
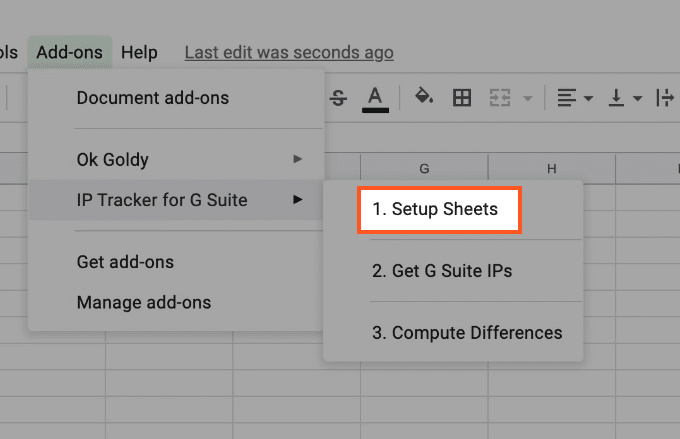
This will make all the necessary connections and also fetch you the needed authorization, along with creating a dedicated worksheet to handle all the information.
Step 5 -: Authorize Script
In the proceeding screen the script asks you to choose the Google Workspace account that you would like to use with this particular sheet.

Once you have chosen your preferred Google Workspace account, it will ask for various permissions that you give to the script.
As you can see, the Google Workspace IP tracker script needs the following permissions from you:
- Edit, create and delete your spreadsheets in Google Drive (for the purpose of altering the sheet you have just created).
- Connect to an external service (in this case, the DNS command to the Google Workspace servers to get the IP addresses).
- Send email as you (the script should be able to send an email when a change in the list is detected).
Once you have given the authorization, the changes in the spreadsheet are implemented.
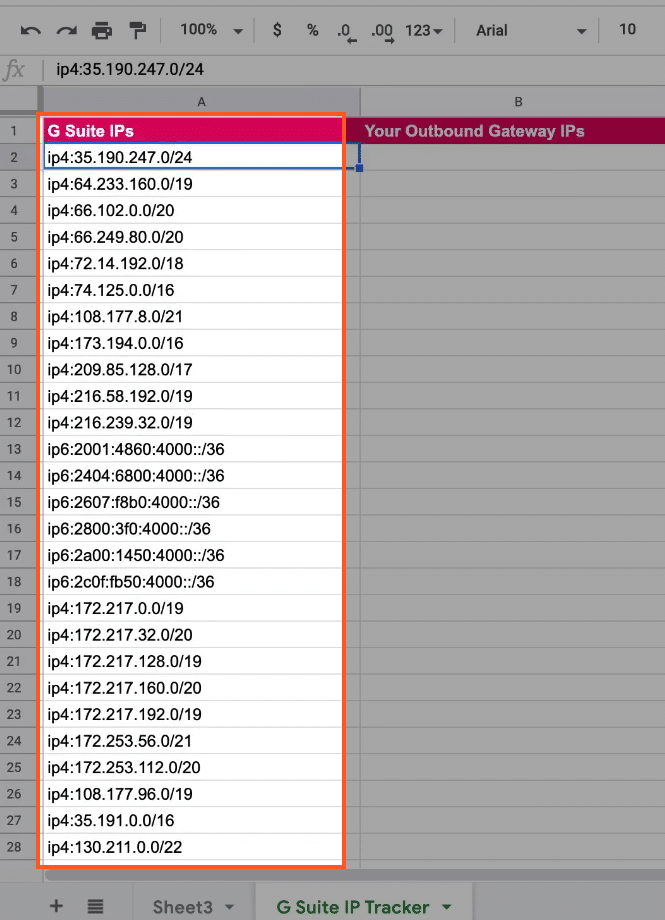
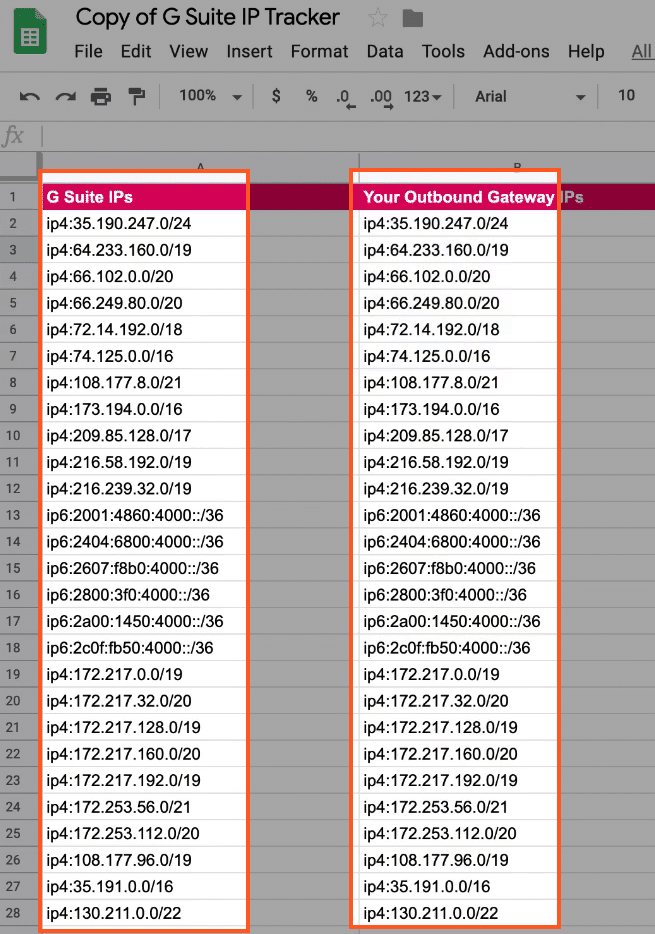
As you can see, all the needed columns are created including
- Google Workspace IPs (the list that is fetched through the DNS command).
- Your Outbound Gateway IPs (the saved list or updated list to which the list in the Google Workspace IPs will be compared).
- Difference/s Detected (in case new or altered IP addresses are found).
- Group Email Address to Notify.
Step 6 -: FETCH G SUITE IP RANGES
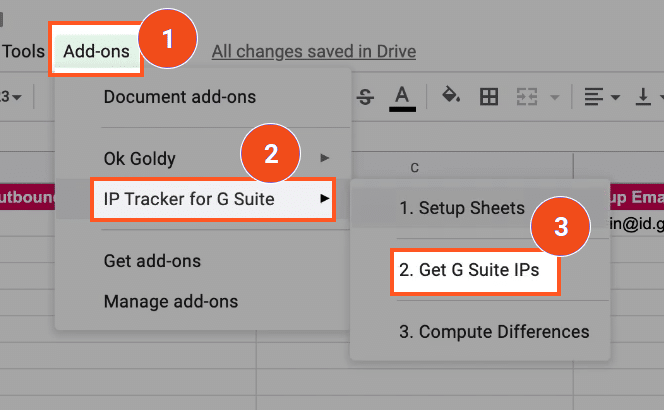
This fills up the leftmost column with all the fetched Google Workspace IP addresses.
Step 7 -: Copy CIDRs to outbound column
Now copy all the IP ranges from "Google Workspace IPs" column and paste them in "Your Outbound Gateway Ips " column, with this, you are assuring yourself that you have added these IP ranges in your outbound gateway.
The first time, and until values in the first column don’t change, these values are going to be the same. The next time “2. Get Google Workspace IPs” is run, the just-fetched values will be compared with the adjacent column.
Before proceeding, you would also like to add an email ID to the “Group Email Address to Notify” column on the extreme right, so that in case a difference is detected, a notification can be sent to the concerned person or persons.
Step 8 -: Copy CIDRs to outbound column
For the first time, you can run the command manually and detect the differences, if any, between the first two columns. Use the following command path:
Add-ons > IP Tracker for Google Workspace > 3. Compute Differences
For the first time, since there might not be any differences, nothing will appear.
Step 9 -: Test the script
Test-run the script by inserting a new CIDR manually (e.g ip4:1132.211.0.1/32)
Note, please make sure to put the IP range as per the formatting in column one (e.g do include ip4: before the CIDR) as shown in the screenshot below.
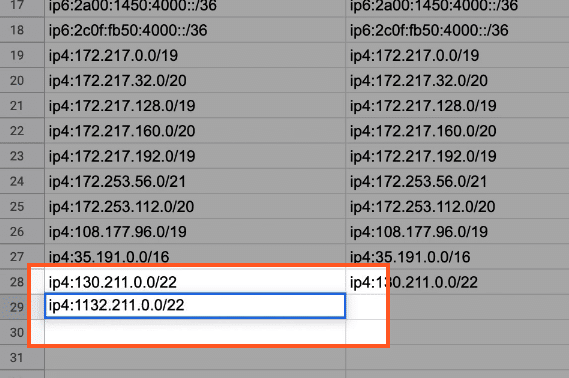
After this, when you run the “3. Compute Differences” command, you will get the following results in the spreadsheet:
Step 10 -: Automate the script
Now you need to run the script automatically.
App Script allows you to executive the commands at a set interval of time so that the updated IP addresses can be fetched from the DNS server and then the new list can be compared with the list previously generated.
For this, you can use the Google apps triggers functionality.
Go to the script editor using the following command path:
Tools > Script editor
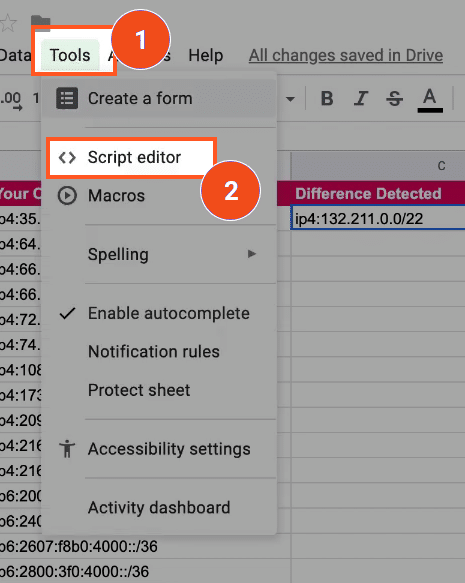
This opens a new browser tab and you can access the area where you can edit the code of the scripts or modify their behaviour.
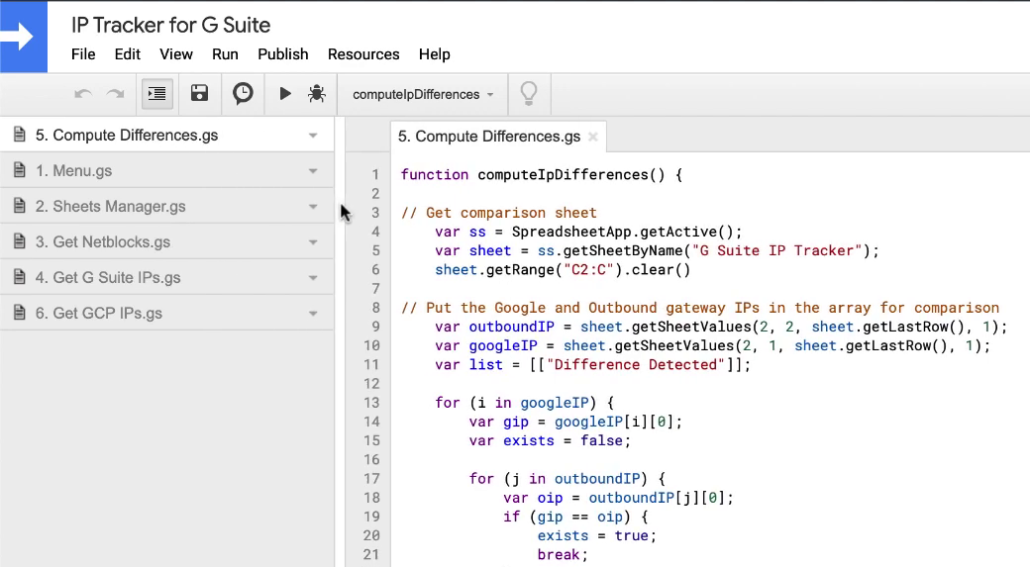
On the left-hand side panel you can see the names of all the scripts that have been installed in your Google Workspace Google Sheets sheet and on the right-hand side you can see the source editor.
Here is a quick primer on what the individual script does:
- Menu.gs – It is executed for the first time when you setup the sheet. It creates the menu items under the Add-ons menu option.
- Sheets Manager.gs – It inserts the sheet where all the action takes place.
- Get Netblocks.gs – Makes the DNS call to get the netblocks behind _spf.google.com
- Get Google Workspace IPs.gs – It queries all of the netblocks one by one and get the list of all IP ranges behdind each netblock.
- Compute Differences.gs – Checks if there are differences between the previously saved list of IP addresses and the newly acquired list, and if differences are detected, send an email to the group (or user) email address provided in the sheet.
- Get GCP IPs.gs –Fetches the GCP IP addresses in case in you need it, I haven't put added it in the menu, but you can run it from the script editor itself.
Now, two scripts can be automatically triggered at set intervals.
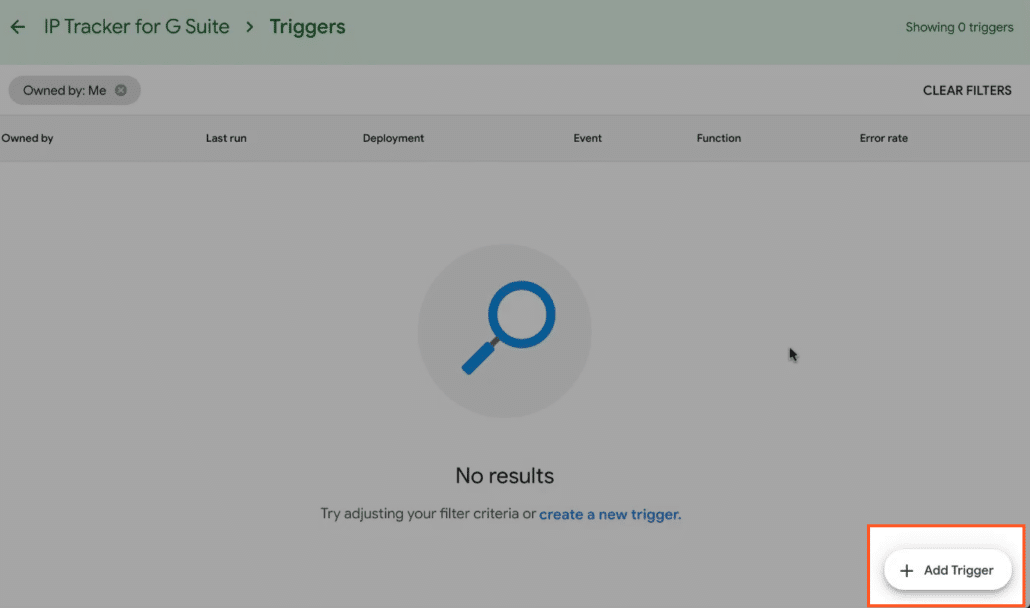
Click the clock icon.
In the preceding screen, click the “Add Trigger” button at the bottom right corner.
Triggers are basically events that are initiated automatically when another event takes place. For example, for our current IP tracker script, we want its modules to execute automatically at a particular time of the day.
I have written the modules in App Script because one, it readily interacts with Gmail and Google Workspace email and two, since it is hosted on the Google Cloud I don’t need to invest in my own Virtual machine to keep the script running so that it performs certain actions at designated times (for this, the script needs to remain in action 24 x 7).
Make the appropriate selections in the proceeding screen. The entire automation process is menu-driven.
To be able to get the Google Workspace mail server IP addresses every day and then compare them with the existing list, you will need to add 2 triggers.
The first trigger is to automatically kick start the getGSuiteIps script function.
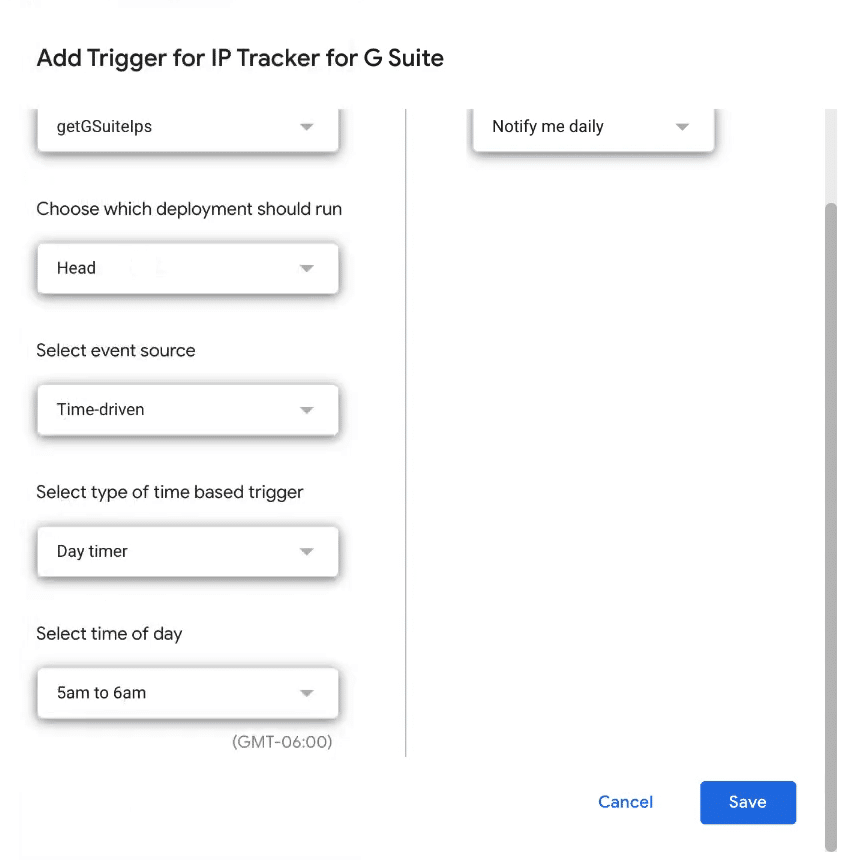
First select the script you want automated, in this case it would be getGSuiteIps.
In the option “Choose which deployment should run” let it be “Head”.
For “Select event source” you can select “Time-driven” because the script should be executed at a particular time of the day.
Let it be “Day timer” for the “Select type of time based trigger” because you want the script to execute once a day.
For the time, you can select “5 AM to 6 AM”.
In the last option, you can instruct the interface to notify you immediately in case there is a problem in the execution of the script.
That’s it. You can click Save and now this script will be executed every morning between 5 AM and 6 AM and the first column of your spreadsheet will be updated with a fresh set of Google Workspace mail IP addresses.
The second Trigger is for the computeIpDifferences module. Again click the Add Trigger button, and in the preceding screen, make the following choices:
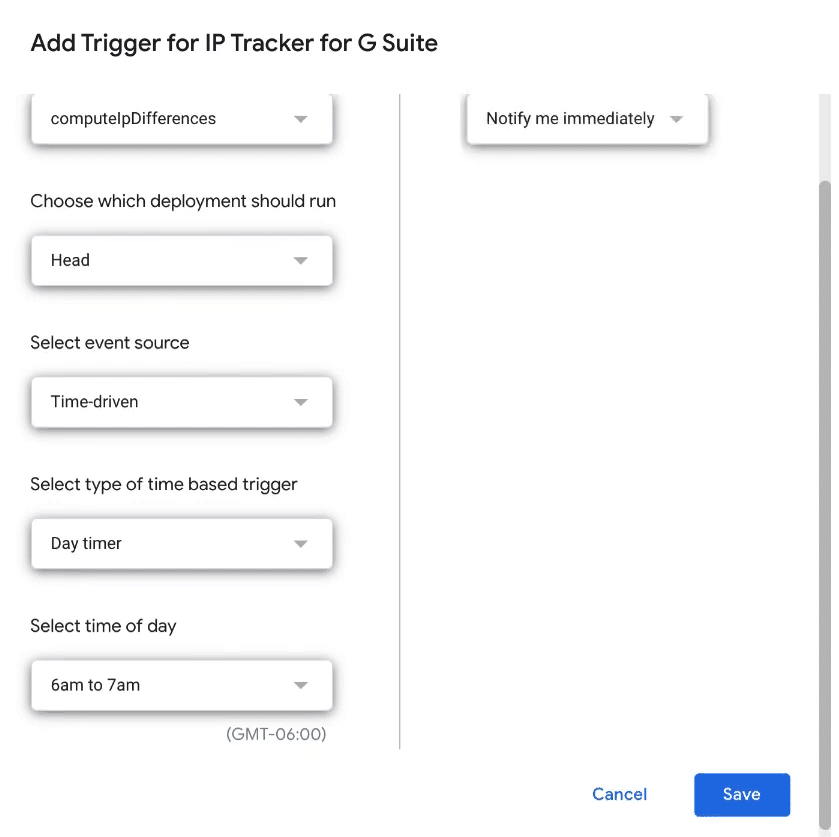
Select the name of the module from the drop-down options computeIpDifferences.
For the “Choose which deployment should run” select “Head”.
For the next drop-down, let the event source be “Time-driven” which means it should be initiated based on the time of the day.
Choose “Day timer” for the “Select type of time-based trigger” because you want the trigger to activate on a daily basis rather than weekly, monthly or yearly basis.
Since the first model you had selected “Select time of the day” as 5 AM to 6 AM, this time, you can select 6 AM to 7 AM.
Select “Notify me immediately” so that in case there is a problem executing the trigger, you are notified.
Click Save to save the second trigger.
Now onwards, every morning, a fresh list of your Google Workspace email IP addresses will be fetched and then this list will be compared with the list that was generated the previous day and if a difference is detected, you will be immediately notified.
FAQ
Most frequent questions and answers about Google Workspace IP Tracker
Do I need a Google Workspace account to run this utility?
You do not. All you need is access to Google Sheet, so it can be your personal @gmail account or Google Workspace account.
This tool can be run with both.
Can you see any data if we use this tool?
No.
Once you copy the script, all the scripts will be local to you then, and will run in your Google or Google Workspace environment.
It has no connection anymore to my original script.
Related Posts
....